How to Start a Weed Eater: Mastering the Basics
When it comes to tackling overgrown lawns and unruly vegetation, a weed eater can be an indispensable tool in your gardening arsenal. Efficiently clearing out weeds, grass, and other unwanted growth requires not just the right equipment but also a fundamental understanding of the proper techniques. How to Start a Weed Eater: Mastering the Basics, we will delve into the essential steps and insights you need to confidently and effectively begin using a weed eater. Whether you’re a beginner looking to learn the ropes or an experienced gardener seeking to refine your skills, this comprehensive introduction will equip you with the knowledge you need to harness the power of this versatile tool.
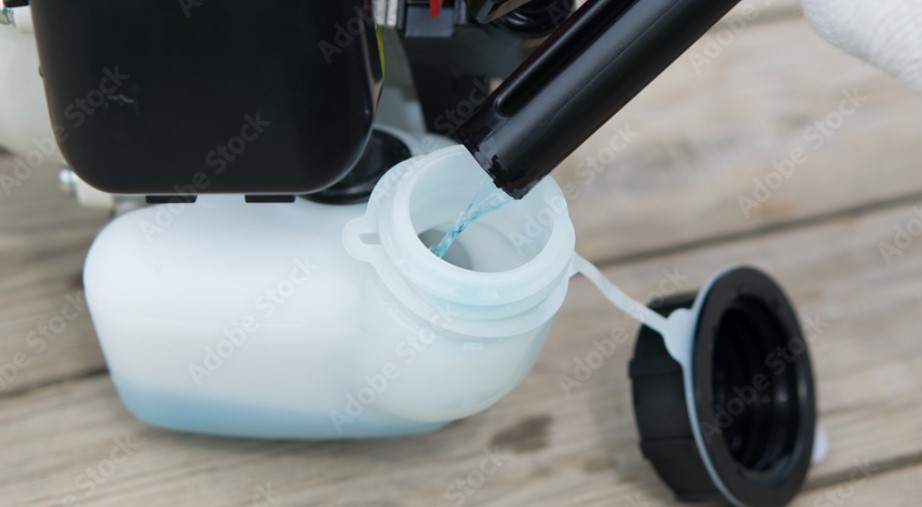
Preparing the Weed Eater
- Check the gasoline: Most weed eaters have a specific fuel-to-oil ratio mentioned in the user manual. Adhering to this ratio is essential for the engine’s health and performance.

In the realm of effective engine maintenance, a series of crucial steps ensures not only optimal performance but also longevity. These steps includes:
- Clean The Carburetor
- Clean/Replace Spark Plug
- Clean/Replace Air Filter
- Clean The Spark-Arrestor Screen
How to Start a Weed Eater: Step-by-Step Process
Starting a weed eater might seem like a straightforward task, but following the correct procedure can be everything you need to guarantee a seamless and trouble-free operation. Let’s explore the step-by-step process for starting your weed eater with confidence.
Step 1: Priming the Engine
The process starts by priming the engine. Most weed eaters are equipped with a primer bulb that helps draw fuel into the carburetor, aiding in the startup process. As soon as petrol can be seen flowing through the transparent fuel lines, repeatedly press the priming bulb. Priming ensures that there’s sufficient fuel ready for combustion.
Step 2: Setting the Choke to the Proper Position
The next step is to locate the choke lever on your weed eater. In colder conditions, setting the choke to the closed position enriches the fuel mixture, making it easier to ignite the engine. If the weather is warmer, the choke should be set to the open position. This step ensures the optimal air-fuel mixture for starting.
Step 3: Holding the Weed Eater Securely
Grip the weed eater’s handle firmly with one hand and hold the shaft or body of the weed eater with the other hand. Maintain a stable and balanced stance to ensure safety during the starting process.
Step 4: Pulling the Starter Cord Smoothly and Steadily
Give a gentle tug on the starter cord to initiate the engine’s ignition process. Avoid yanking the cord too forcefully, as this can lead to engine flooding or cord damage. A smooth and steady pull is usually sufficient to kickstart the engine.

Step 5: Releasing the Choke Gradually as the Engine Warms Up
Once the engine fires up, allow it to warm up for a short while. As the engine begins to reach its optimal operating temperature, gradually release the choke by moving the choke lever to the open position. This step ensures that the air-fuel mixture is appropriately adjusted for continued smooth operation.
Troubleshooting Common Starting Issues
Starting a weed eater might not always go as smoothly as planned. However, with a bit of know-how and troubleshooting, you can overcome common issues that might hinder the process. Let’s delve into the steps to troubleshoot some of the frequently encountered problems when starting a weed eater.
Handling Engine Flooding
Engine flooding occurs when excess fuel floods the combustion chamber, making it challenging to start the engine. To address this, follow these steps:
- Depress the throttle trigger fully to engage the “full throttle” mode.
- Hold the throttle in this position and pull the starter cord briskly a few times to clear the flooded engine.
- Once the engine shows signs of starting, release the throttle trigger and continue pulling the starter cord until the engine starts.

Starter Cord Challenges
A stuck or difficult-to-pull starter cord can prevent the engine from starting. Here’s how to troubleshoot this issue:
- Ensure the weed eater’s safety switch is disengaged, allowing the starter cord to move freely.
- Gently pull the starter cord out until you feel resistance, then give it a brisk, smooth tug to start the engine.
- If the cord remains difficult to pull, inspect for any visible obstructions or tangles in the cord mechanism. Clear any debris that may be impeding its movement.
Engine Stalls Solutions
Engine stalling shortly after starting can be frustrating. Here are steps to address this issue:
- Check the air filter for blockages. Stalling can occur as a result of a blocked air filter that restricts airflow. Clean or replace the filter as necessary.
- Adjust the carburetor settings. A carburetor that’s out of tune can cause stalling. Consult your user manual for instructions on adjusting the carburetor screws.
- Check to see if the spark plug is clean and gapped correctly. A fouled spark plug can lead to poor ignition and stalling. Clean or replace the spark plug and adjust the gap if needed.
- Monitor the fuel mixture. If the fuel mixture is too rich or lean, the engine may stall. Ensure you’re using the correct fuel-to-oil ratio and that the carburetor settings are appropriate.
- Examine the fuel lines and fuel filters for blockages. Blocked fuel lines or a clogged fuel filter can disrupt fuel flow, causing stalling. Clean or replace these components as required.
Final Thoughts
A fundamental skill for any gardener is mastering the art of starting a weed eater. With the right techniques and understanding, you can ensure not only a smooth start but also the safety and efficiency of your yard work. From priming the engine to releasing the choke as it warms up, each step plays a pivotal role. Remember, practice and patience go a long way in perfecting your starting process. By following the guidelines presented in “How to Start a Weed Eater: Mastering the Basics,” you’re equipped to confidently tackle your outdoor tasks and maintain a well-kept landscape.
Related Articles