How To Fix Leaking Hose Nozzle | Solutions for Effective Watering
A leaking hose nozzle can lead to water wastage and decreased watering performance. In this comprehensive guide, we’ll explore effective solutions for maintaining efficient watering with our guide on “How To Fix Leaking Hose Nozzle.” Learn to effortlessly restore your hose nozzle’s functionality and ensure optimal water distribution for your plants and garden. Save water, time, and money while enjoying a hassle-free watering experience with our expert tips and practical solutions.
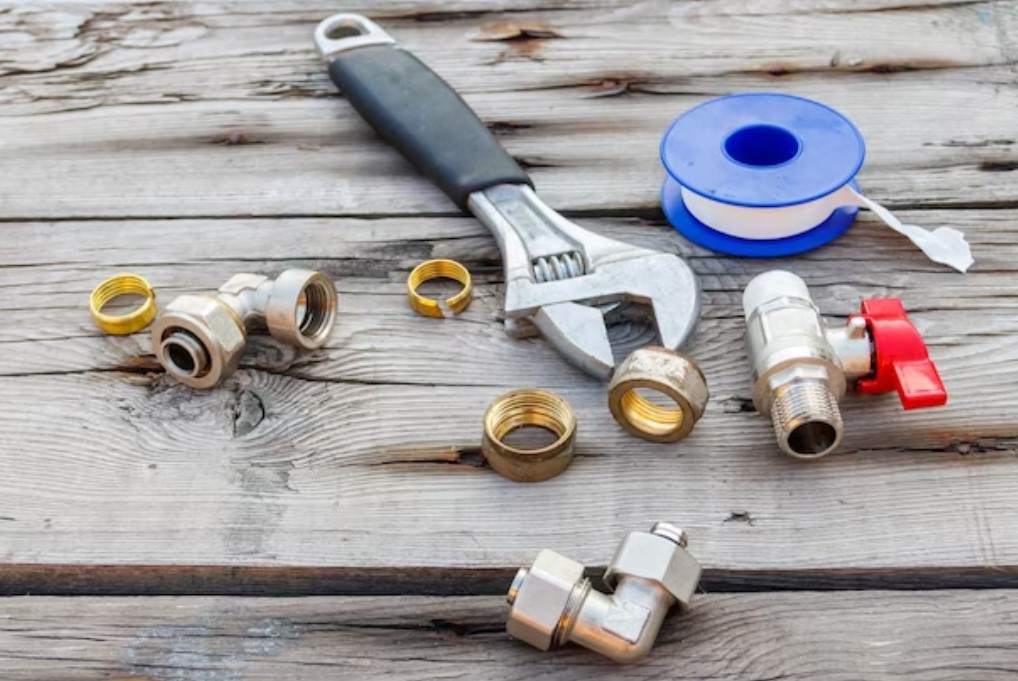
Tools for Fix a Leaking Nozzle
Here’s a closer look at the key tools required for effectively fixing a leaking nozzle:
- Wrench
- Tape
- Gloves
- Replacement Parts: washers, gaskets, and O-rings
- Eye Protection: goggles or protective glasses
How To Fix Leaking Hose Nozzle: Step-by-Step Repair Guide
A leaking hose nozzle can be a frustrating issue, leading to water wastage and diminished watering efficiency. Fortunately, tackling this problem is well within your reach. With a systematic approach and the right techniques, you can restore your hose nozzle to its optimal functionality. A comprehensive step-by-step repair guide to help you fix a leaking hose nozzle:
Step 1: Diagnosing the Leak
Before diving into the repair, identify the source of the leak. It’s really necessary to accurately determine the specific location of the leak; make sure to examine both your hose nozzle and its connections thoroughly. This diagnosis will guide your repair efforts and help you choose the most appropriate solution.

Step 2: Fixing a Leaking Nozzle Body: 4 Fast Fixes
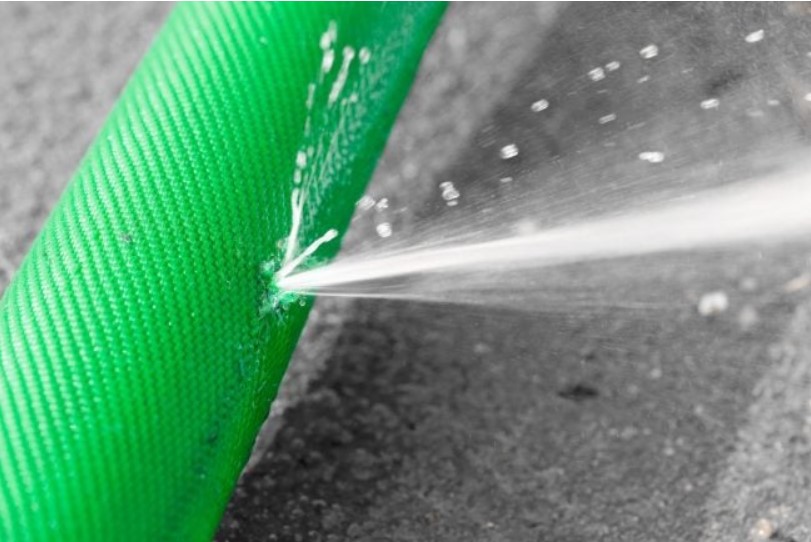
1. Seal Small Holes with Electrical Tape
Annoying tiny holes can often go unnoticed until you attach the water source and observe small bursts of water resembling geysers spraying from the damaged part of the hose. Electrical tape, typically consisting of a PVC backing and a rubber-based adhesive, possesses the necessary flexibility, insulation, and weather resistance to effectively seal these openings. However, if leaks persist, you might eventually require a hose mender.
First, turn off the water supply, detach the hose, and use a cloth to dry it thoroughly. Identify the punctured area and mark it with a marker. Proceed to wrap electrical tape around the marked zone, ensuring a few layers overlap for strong adhesion. Be cautious not to wrap too tightly, as this could cause the hose to fold and hinder water flow. Once this is done, reconnect the hose to the faucet or sprayer and start the water to confirm the issue is resolved.
2. Repair Large Tears with a Hose Mender
Bigger ruptures in a hose often occur due to snagging on trees or bushes, cracking due to exposure to extreme temperatures, or even being chewed on by a mischievous pet. When you open the tap, water will forcefully spurt out from these tears. But fear not; a hose mender can come to the rescue. This handy device, available in both plastic and metal versions, acts as a short tube that replaces the damaged section.
To initiate the repair process, start by turning off the water supply. Next, detach the hose from its connection point. Then, utilize a hose cutter or garden shears to effectively remove the torn portion. Proceed to attach the hose to the connections on the hose mender. Finally, tighten these connections by giving a clockwise twist to the two collars on the mender. Once this is done, reconnect the hose to the faucet or sprayer and start the water to ensure there are no lingering leaks.
3. Fix a Leaky Coupling with a New Hose Gasket
One of the most frustrating issues that can arise with a garden hose is a leak in the coupling—a metal or plastic fitting located at both ends of the hose, serving to connect it to a spigot, nozzle, or sprinkler. If you notice a consistent drip emerging from the hose couplings as you attach it to a water source, it might be time to consider replacing the gasket. Gaskets naturally degrade over time due to water exposure, so it’s a good idea to replace your hose gaskets every three to 10 years.
To address this, start by turning off the water supply, disconnecting the leaky end of the hose, and utilizing needle-nose pliers to remove the old gasket from the coupling at that particular hose end. Then, insert the new gasket into the hose coupling using your fingers. Generally, thicker O-ring gaskets provide a more secure watertight seal, as compared to flat gaskets that might not conform as well to the coupling’s contours. Once this step is complete, turn on the water and link the hose to a faucet or nozzle to confirm that the coupling is now free from leaks.
4. Replace a Bent Coupling with a New Hose Coupling
Should the coupling at either end of the hose persistently leak even after changing the gasket, it’s possible that the coupling has been deformed due to an encounter with a lawnmower or other heavy equipment. A bent coupling disrupts the waterproof seal connecting the hose to a spigot, nozzle, or sprinkler, resulting in a leak.
For a lasting resolution to this issue, the best course of action is to replace the bent coupling with a new one that suits your requirements. Couplings come in two types: female, which connects to the spigot, and male (like the Nelson Male Hose Repair, available on Amazon), which connects to a nozzle or sprinkler. Additionally, ensure that the chosen coupling has the same diameter as your hose.
To proceed, turn off the water supply, detach the hose, and use a hose cutter to remove the entire deformed coupling. Insert the exposed end of the hose into the coupling’s connector, then twist the coupling’s collar clockwise to securely fasten it. Turn on the water to make sure the coupler is leak-free again before reattaching the hose to a spigot or nozzle.
Step 3: Addressing Other Leaks
- Patch Holes and Cracks: For holes or cracks in the hose itself, you can use a hose repair kit or cut out the damaged section and attach the two ends with hose clamps. This method effectively seals the breach and prevents further leaks.
- Replace Worn Parts: If you identify worn-out washers, gaskets, or O-rings during your inspection, replacing them plays a crucial role in maintaining a tight seal and preventing leaks.
Testing the Repair
Testing the success of a repair is essential for ensuring the success of your efforts and the longevity of the fix. After addressing the garden hose issue and implementing the necessary repairs, it’s time to put your work to the test. The testing process involves several key steps to confirm that the repairs have been properly executed and that the hose is now fully functional.
Reattach the Hose to the Water Source
When you have completed the repairs, carefully reattach the hose to the intended water source, whether it’s a spigot, nozzle, or sprinkler. Make sure that the connection is reliable and securely fastened to prevent any potential leaks. This step is vital as it reinstates the flow of water through the hose, allowing you to assess the effectiveness of your repair work.
Start the Water Flow and Look for Leaks
With the hose securely reattached, turn on the water supply gradually and observe the entire length of the hose, paying close attention to the areas where the repairs were made. Watch for any signs of leakage, such as drips, spurts, or steady streams of water. It’s advisable to conduct this test in an open area where any leaks will be easily noticeable. If you detect any leaks, take note of their location and severity.
Nozzle Adjustment and Issue Check
As you assess the repaired hose for leaks, also take this opportunity to check the performance of any attached nozzles or sprinklers. Test different nozzle settings or spray patterns to ensure that they are functioning as expected. Additionally, if you initially identified a specific issue with the hose, such as reduced water pressure or uneven water distribution, evaluate whether these problems have been resolved.
In the event that you encounter leaks or any lingering issues during the testing phase, it’s important to address them promptly. Depending on the nature of the problem, you might need to reevaluate the repair, make necessary adjustments, or consider further replacement of parts.
Summary
In the quest for efficient watering, addressing a “Leaking Hose Nozzle” emerges as a paramount task. By meticulously applying remedies like tightening connections, replacing gaskets, or utilizing waterproof tape, leaks can be staunchly controlled. “How To Fix Leaking Hose Nozzle: Solutions for Effective Watering” not only extends the nozzle’s lifespan but fosters sustainable water use. By employing these carefully selected strategies, the challenge posed by a leaking hose nozzle can be turned into a chance to embrace eco-conscious practices. This approach not only aligns gardening efforts with environmental responsibility but also encourages the cultivation of lush and thriving landscapes.
Related Articles